20 10 2020

Bow Tie Maid Dress

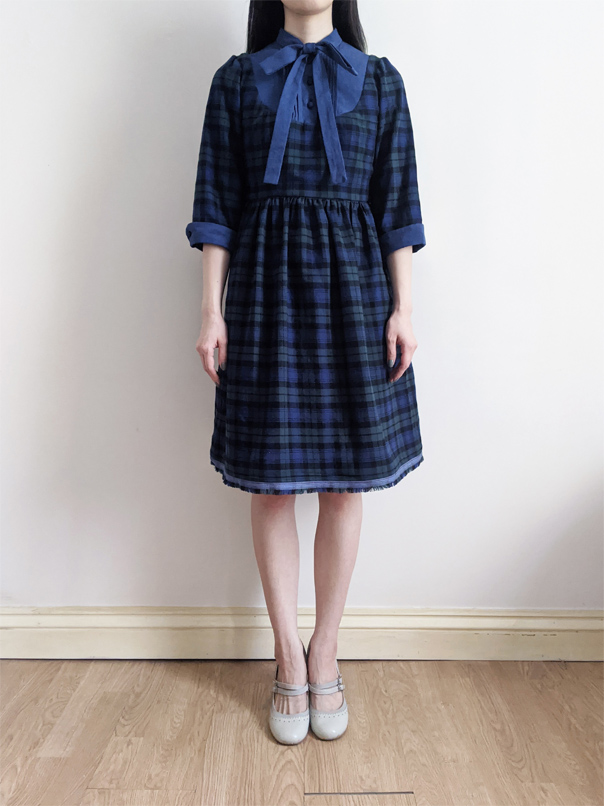
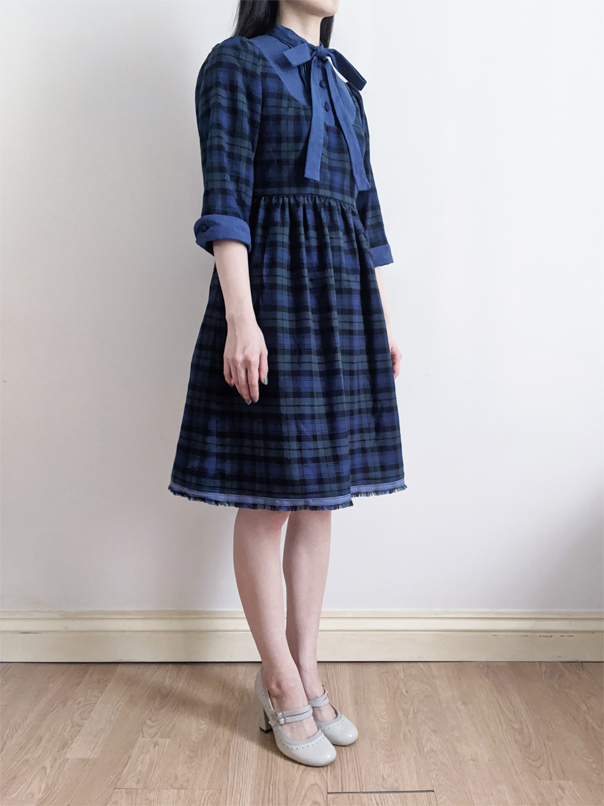
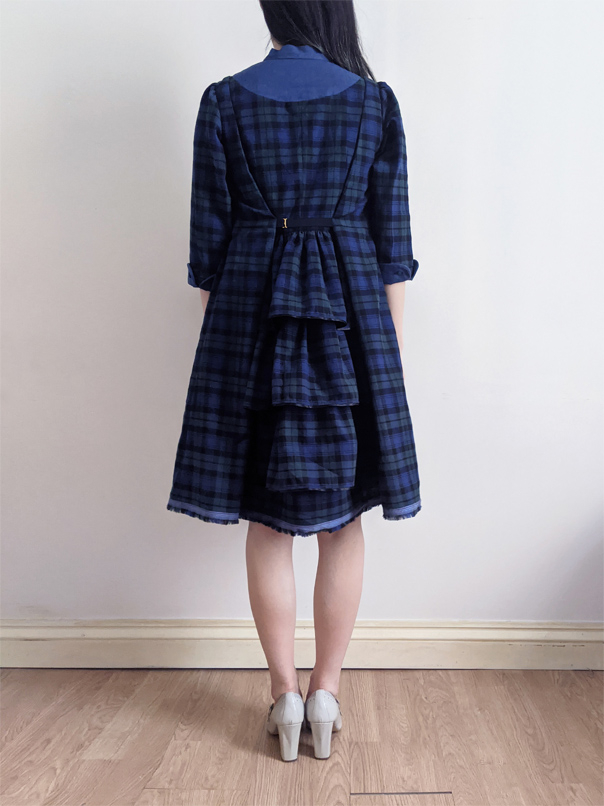
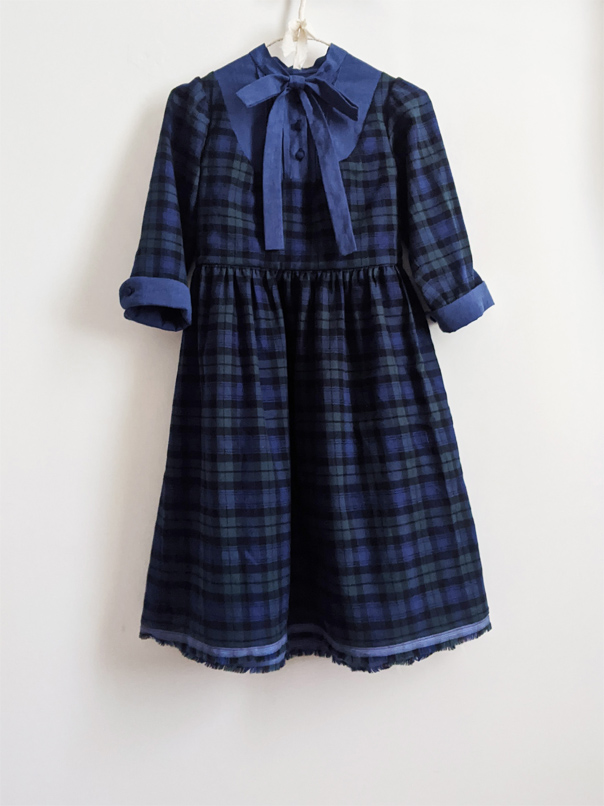
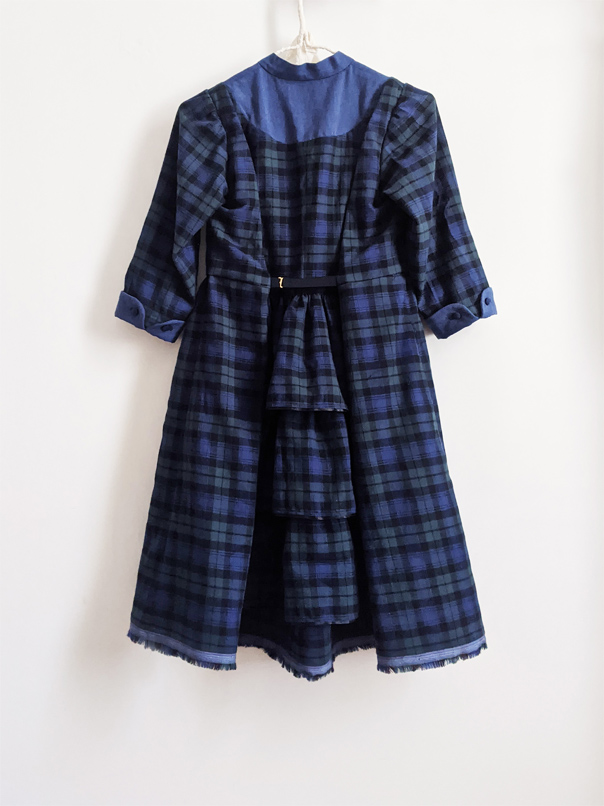
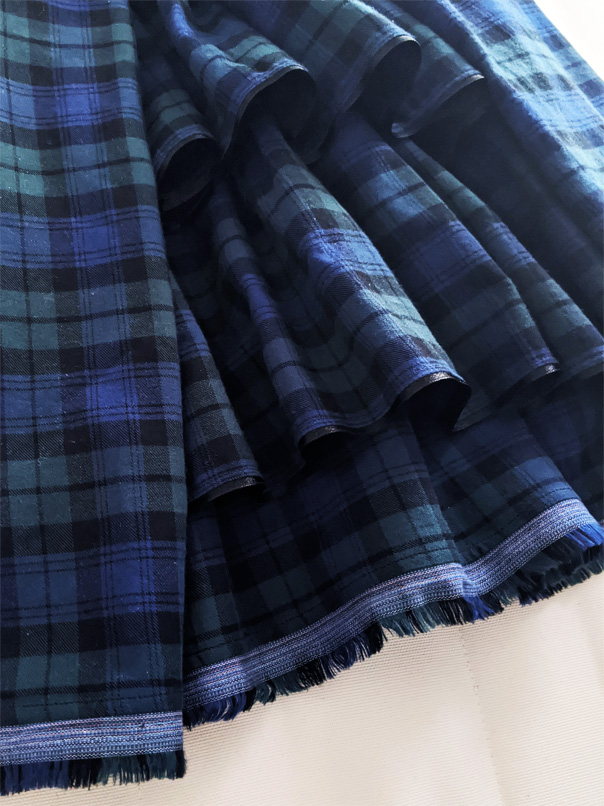
This is the final version of the commissioned maid dress made with black watch tartan fabric. It is basically the same as the prototype but it has a very different feel to it because of the fabric/colour combination. The main fabric is a soft woven tartan fabric in cotton and the contrast fabric used for the bib section and cuffs is a blue chambray cotton.

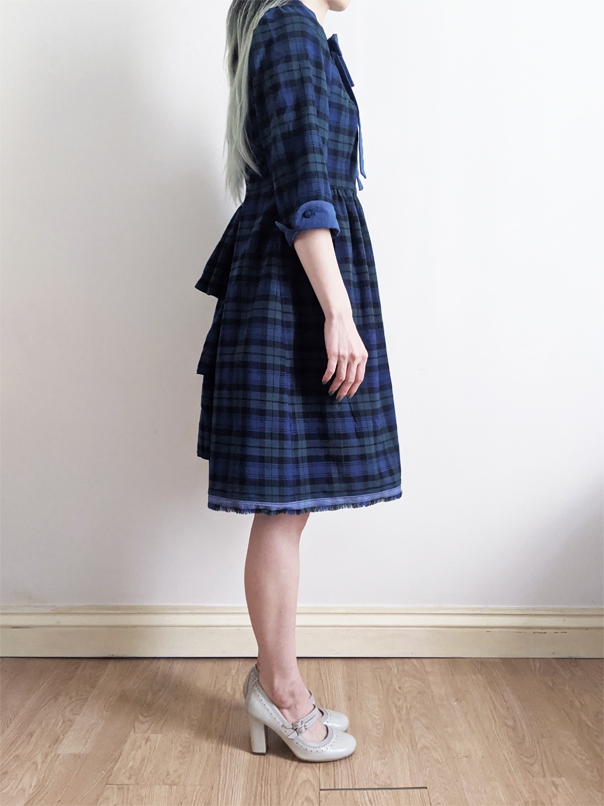
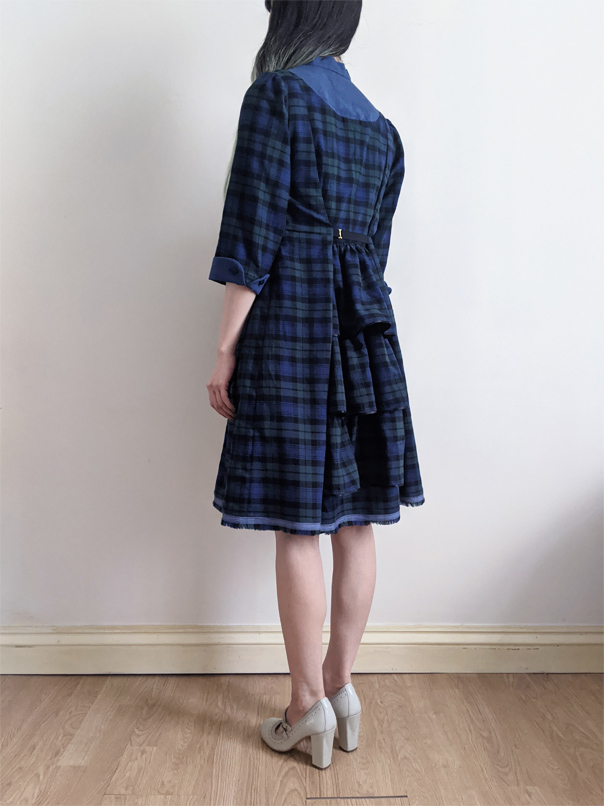
Black satin ribbons are used on the three tiered ruffles on the back skirt as trimmings. And, I would like to point out that the selvedge of the tartan fabric has been used for the hem. I noticed that the selvedge looked rather nice when I was cutting the fabric and decided to used it. Naturally, it matches the dress very well.

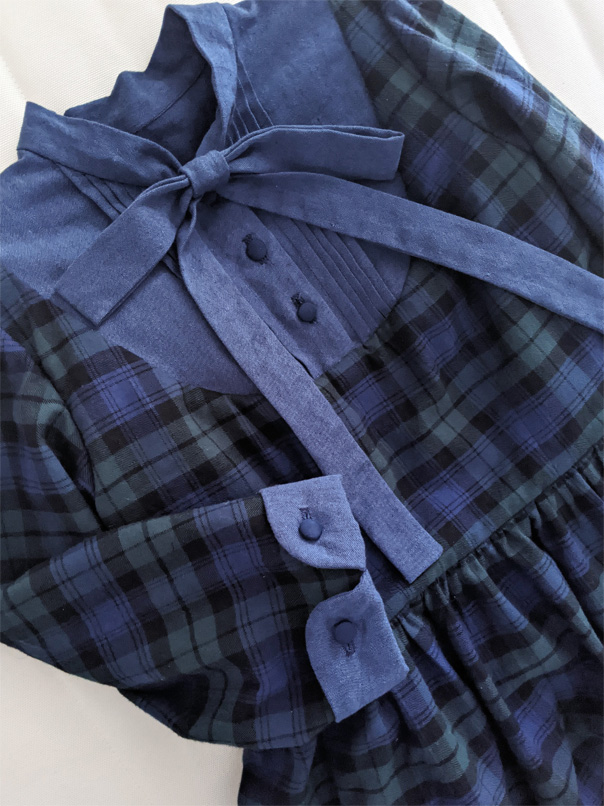
The bow tie is actually different from the prototype although it is not obvious. Unlike the prototype, which had loose ribbons to tie into a bow, this one has a pre-made bow with an elastic loop at the back to put the ends of the loose ribbons through it. The customer said she is fond of bow tie necklines but finds it difficult to tie a good-looking bow by herself so this was my solution.

The maid dress takes a lot of time to make due to the complicated construction and the number of pieces to sew together. It took even more time for this one as using patterned fabric means I had to make the patterns align and match up perfectly. However, the maid dress is certainly cute and beautiful in my opinion. I hope I will get to create different versions in the future too.

Share
24 09 2020

Bow Tie Maid Dress Prototype

This is a prototype I made for a commissioned dress based on the maid dress I made before. It has a knee length skirt instead of a mini skirt and a bow tie instead of a collar. Details include pin tucks at the bust, rolled up contrast cuffs with fabric covered buttons, three tiered ruffles for the back skirt, and cotton ribbon trimmings.

It has a fitted bodice but it doesn’t have a zipper in the back so how do we wear this? My maid dress has a large pleat on both sides, starting from the shoulders. They open up when the strap at the back waist is unhooked and the dress becomes loose from the pit down. Personally, I don’t like the look of zippers on dresses because they look harsh and/or too bling. There are also fears of breaking and fabric getting caught so I avoid them unless it’s for activewear.

I combined 6 different fabrics in white, beige, and pink tones from leftover fabrics to use them up. They were not the colours or the colour/fabric combinations I would go for if I was fabric shopping but I think the result is successful. It makes me think of mocha and macarons, perfect for the tea and cake context.

Share
14 06 2020

Embroidered Face Masks

Hello, I am still alive. I hope you are doing okay too. I have mainly been busy doing translation work and games testing, and also made my first desktop PC, but I have done some crafting too.

I have designed a set of face masks for my friend who wanted a set of two, each of them embroidered with my frequently used sentences, ‘Are you okay?’ and ‘I will be fine.’ She wanted them to be large, in pleated style(not in shaped style), pale coloured, and didn’t want the elastics to be too tight. I had a look through my fabrics and chose light weight lemon colour cotton and pastel orange cotton because I thought those colours are not associated with the medical envoriment. I chose fluorescent pink for the embroidered text so it stands out and completes the citrus/candy colour combination.

I’ve done some research on the internet and tried out with pieces of paper and came out with the sizing of 21cm acrross, 16cm top to bottom, which is probably one of the largest you’ll find. I noticed some masks have a pocket to insert a filter so I thought I’d add that too. I used two layers of the front side fabric so the inside fabric doesn’t show through and used three layers of double layer gauze for the inside so the back side of the embroidery won’t show from either side. So, it’s eight layers in total like this:

embroidered text on top

2 layers of front side fabric

1 layer of double layer gauze

back side of embroidery (It must not be seen. Hide this!)

1 layer of double layer gauze

pocket opening

1 layer of double layer gauze

The result is soft and fluffy… The top and bottom seams are turned to the back side, stitched down, and pressed, so the gauze fabric won’t peak from the front side. The sides are bound with separate fabric (pastel orange) to create a loop for the elastics with no visible stitches on the front side of the masks. The design and those processes use more material and make the whole production time much longer, but it’s worth it. And I know that some people will notice the difference.

I’ve also made a few in navy for some people who prefer, or I thought might prefer, darker colour. I still haven’t made one for myself but maybe I will when I run out of my disposable ones that I had already as a typical Japanese. Stay safe and take care!

Share
03 09 2019

Large Messenger Bag

I’ve been wanting to make a simple messenger bag for myself for small walks but I’ve been putting it off to do other projects. But recently, my sidekick has broken a collar bone and he can’t move one of the arms for a while. It seemed like a good time to make one for him before I make my own. This one is pretty big since it wants to hold a lunch box horizontally and a water bottle at least.

I’ve used cotton drill fabric in greyish blue as the main fabric and cotton fabric in pale smokey blue as the lining fabric. I’ve added one large pocket on the outside under the flap, another large pocket inside, and a small zip pocket inside as well. I used the lining fabric to add piping to the flap. I didn’t have a strap adjuster at home so I skipped it since I knew who would be using it and could measure approximately how long it should be.

You might think you mostly do things using just one hand, but actually, you need the other hand to hold the object very often. For example, How are you going to get things out of your tote bag with one hand when you’re walking/standing? You would need to put your bag down somewhere… Anyway, I hope this messenger bag will be useful! It took me about 2 days to make the pattern and sew it up so it was a simple project. I will be looking forward to making mine one day.

Share
11 08 2019

Grey Flannel Tailcoat

I have finished making the commissioned tailcoat for my friend. It is a size bigger than the calico prototype and has slightly longer sleeves since she decided to keep the calico one for summer and have this one for colder seasons. The main fabric is a light grey flannel fabric in cotton polyester and the lining is cotton polyester in cerise. Black cotton velvet is used for the upper collar. I’ve used black plastic buttons to match it.

Share
31 07 2019

Button Front Skirt

Sometimes, it’s fun to be inspired by the fabric to make something instead of buying fabrics for specific projects. I went fabric shopping the other day and found this lovely cotton linen fabric in the sale section by chance. It has large irregular dots in navy and flying birds in silver on a teal base. I later learnt that the fabric was designed by cocca, a Japanese textile label, and had to admit that I’m undeniably Japanese after all.

I had only bought a meter since it was still not the cheapest fabric so the design had some limitations. I couldn’t incorporate pleats or deep scoop pockets as I wanted and had to go with gathers and in-seam pockets but I’m happy with the result. I suppose it was better in the end since the pattern would be less broken up this way. While making, I realised that I have to take into consideration how the patterns would be placed when working with bold prints. Large dots clashing at the seams would be undesirable in this case. I’ve used mirrored plastic buttons that I had at home as I thought the shape and colour would match the print.

I don’t wear bold prints much and I’m not too keen on having animal motifs on my clothes but I fell in love with the colour combination and the hand drawn design. Somebody else chose the Mina Perhonen for Tokyo Skytree T-shirt for me when I was back in Japan. Of course, I had to pair the very few clothing items with animals on them.

Share
30 05 2019

Tailcoat prototype

Hello, I am still alive. I’ve finally made a calico prototype for the tailcoat my friend has commissioned me a few years ago. The reason it’s taken so long is mainly because I’ve never made a jacket before and it was going to be a challenge for me. Since this particular friend always has something for me to make, this one got put off until it became the priority.

The order was to design and create a feminine tailcoat. The body and arms are relatively fitted and the hem draws a smooth curve from the cut off front to the knee length tail. It has a shawl collar and is double breasted. The final design might be altered but here it is to start with.

I used scrap calico where I could as long as it was symmetrical so there’s a subtle patchwork effect which I quite like. You can see it better in the close up photo of the lining. The four gold buttons are spare regimental buttons I had, but don’t know why I have them. The skirt is just a sample circular skirt I styled the jacket with and not part of the garment.

Share
02 11 2018

Clown costume

Happy belated Halloween! I’ve made a clown outfit for myself this year. It’s inspired by Pierrot, the sad clown wearing a loose white costume with details in black. I didn’t have much time so I didn’t make a prototype to test the pattern but it turned out okay by combining and adjusting existing patterns for garments I’ve made in the past.

The white shirt is made with light weight cotton with a polka dot texture. The double layered collar uses a Swiss dot cotton fabric for the top layer and is trimmed with black satin ribbon. The cuffs are elasticated and frilly with matching ribbon trimmings. There are 2 handmade resin buttons under the collar with “M” and “S” buttonholes and 2 fabric pom-poms attached above press on buttons made with black fabric strips.

The diamond patterned trousers are made by patchwork using black and white cotton. The waist is elasticated and the hem is slightly pleated into the black binding for cuteness. I’ve included a photo of the reverse side of the trousers so you can see what’s going on on the other side of the diamond pattern, which is an interesting pattern as well. Hope you like it!

Share
27 09 2018

bright red boat neck dress

Hello, I am still alive. Here is a simple fitted dress I’ve made for my friend on commission as she wanted a bright red dress. It was my first time making anything with a zipper, I think. The baby blue version is the prototype I made first with spare cotton fabric. The final version has a wider neckline and a shorter skirt. Made of 100% viscose fabric.


Share
04 02 2018

sheer black shirt dress

Here is a dress I have made recently on commission. My friend liked the black crinkle chiffon with tiny flocked stars I used for the witch costume and asked me to make a maxi shirt dress out of it. The design is kept simple and doesn’t have much detail to describe but it has slits on both sides for ease of movement as she asked for a slim fit. I was originally looking for star shaped buttons in metal to go with the pattern but those clear iridescent domed buttons caught my eye. I thought that the rainbow sheen would look pretty in contrast to the black fabric. I’m more of a mini skirt/dress person with a girlie taste so this dress is different from my style but hope it looks nice and elegant.

Share